Onstage 2016 Day 1 & Day 2 Wrap Up

I’ve come up to Brisbane for Stampin’ Up!’s international conference #Onstage2016.  There are 4 of us that have driven up to Brisbane together from Sydney.  Other team members flew up but we decided to start our adventure early and left early Wednesday morning to come up.  It was a long day but was fun.

Day 1 of Onstage 2016 was great as we received the brand new Occasions catalogue & Sale-a-bration Catalogue.  I also was lucky enough to receive a Prize Patrol.

Day 2 saw us starting with a Main session full of stampin’ demonstrations by our local demos.  We also had a lot of business talks throughout the sessions and then it was time for us to do some stamping.  We all broke up into 4 groups and made some make & takes to get to play with some of the new fantastic products.

This afternoon we had another main stage session with some more business tips and stamping demonstrations.

I can’t share any of the products I’ve seen so far but can start sharing from next week.  If you’d like to receive your own copy of these catalogues, then please contact me and I will get one in the post for you as soon as I get them. onstagelp_nov2016_newdemo_apr1816_eng

My Swap for OnStage Brisbane

When we go to any event with Stampin’ Up! we are encouraged to make swaps to share our designs with others.  We usually make a card front and have the recipe of ingredients listed on the back so other demonstrators can be inspired.

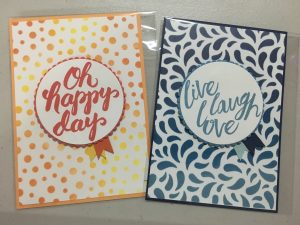
I used Pinterest for some inspiration along with a card that my upline Marelle Taylor made.  I used the new sponge brayers and the Seasonal Decorative Masks to make the backgrounds.

I used the new Layering Circle Framelits for the sentiment and the words were from two stamp sets, Scenic Sayings & Layering Love.

img_8810

I enjoyed making these two cards.  The card on the left I brayered randomly with different inks.  The card on the right I just brayered in ombre design.  I hope you like them.

Wonder of Christmas

The Angel from the Wonder of Christmas Stamp set is so lovely that I wanted to play with it

I did the same design but with different card bases & ribbons.

wonder-of-christmas

I’ve used Rich Razzleberry ink for the Angel and stars.  I then used markers to colour the Angel in.

I tied Mint Macaron striped ribbon on the Mint Macaron Card Base & then I used the Sweet Sugarplum Ruffled Ribbon on the Sweet Sugarplum Card Base.

School Holiday Children’s Card Classes

I’ve been holding Children’s Card Making Classes for over a year now and the boys & girls that come along love the creativity of card making.  I have two girls (9 & 7) and they love to see all the creations I make for the upcoming classes.  They also get to join in depending on the number of kids that attend.

I’m holding some more kids card classes during these Spring School Holidays.

This time the kids will be making Christmas Cards so that they are ready to hand them out to their friends in 4th term.

Wednesday 5th October 10am-12pm (4 places available)
Wednesday 5th October 2pm-4pm (6 places available)
Thursday 6th October 10am-12pm (6 places available)
Thursday 6th October 2pm-4pm (6 places available)
Friday 7th October 10am-12pm (4 places available)
Friday 7th October 2pm-4pm (6 places available)

The children will be making 6 cards each at a cost of $30 which will include all the supplies they need to make the cards.  I have a maximum of 6 students per class so they can get the help they need to complete the projects.

I hold the classes in my home in West Pennant Hills and I have a current WWCC number.

If you’d like to know more information, please don’t hesitate to email me.sept16cardclass

Star of Light

Since the new Holiday Catalogue came out I haven’t had the time to play with the new products that I ordered.

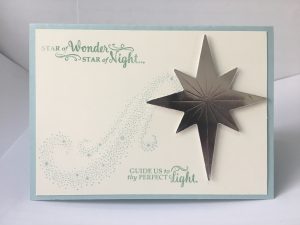
Today I had the time to just sit and play with some new gorgeous products.  When I first saw the Star of Light Stamp Set I knew I had to have it.  It is a beautiful stamp set with some great versatility.  And then you pair the stamps with the matching Starlight Thinlits and you have a magical combination.

star-of-light

I used a Soft Sky card base, stamped on a Very Vanilla card stock.  Cut out the Star out of Silver Foil Sheets and then stamped in Mint Macaron & Soft Sky.

Blooms & Wishes Stamp Set

The Blooms and Bliss stamp set is one of those sets that can be so versatile for back grounds. You can easily use it to make your own Designer Papers.

Blooms and Bliss

When I go searching for ideas for Thank you’s for my customers I go straight to one website, Pootles.co.uk. Sam Donald has so many fantastic ideas for Thank you’s. As I was searching through her videos on Youtube I came across this notepad that she did using the colours from some current designer papers.  I thought that was a great idea as a thank you to my customers.  I was inspired by the Blooms & Bliss DSP so used those colours and the Blooms & Wishes stamp set to make these gorgeous cards & notepads.

Blooms&Bliss_card

All my customers who purchased through me in June received this notepad & card.  I didn’t write in the card as I wanted them to be able to send it onto someone themselves.  I love this set and the colours are just divine together.

If you’d like to order the Stamp Set then you can go to my online shop and purchase yours today!

Designer Tin of Cards by Stampin’ Up!

What’s better than giving a handmade card? Having a tin of handmade cards ready to give! Make a stack of all-purpose cards using pre-cut, colour-coordinated paper and accessories, then store them in a pretty tin until you need them. See for yourself how easy creativity can be!

You can buy this kit anytime and have it delivered straight to your door. Why not order some adhesive & scissors to go along with your Designer Tin of Cards