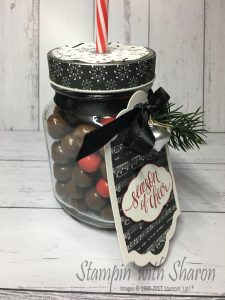
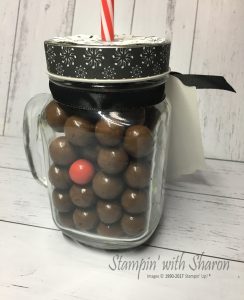
For my Day 5 project I made up a jar with “Reindeer Noses” inside which are Malteasers and Jaffas. Its a cute little project that anyone would love. A great gift for kids too though maybe a bit too much chocolate.
I’ve used the Merry Music Specialty Designer Series Paper, Green Sprigs, Mini Ornaments & Black Shimmer Ribbon and purchased the glass jar from Kmart.
I’ve listed all the products used at the bottom of this post.
The 12 Days of Christmas continues with the this gorgeous project.
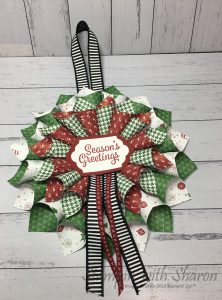
This is a gorgeous paper wreath that I’ve seen on different Facebook pages and so I have made my own to go on my front door. I just love the colours of Cherry Cobbler & Garden Green together. They really are great Christmas Colours. I added the Black Striped Ribbon to add some more contrast and added in the Cherry Cobbler Stitched ribbon.
I have used the sentiment from Snowflake Sentiments and cut it out with the Lots of Labels Framelits.
And here is it on my Front Door. I was concerned that with some of the rain that it may get damaged or with the sun that it will fade but, as my husband said, you can make another next year. Well why not make another one next year 🙂
I have included a video of how to make this project as well so you can make one at home. Or you can contact me to find out how to make it.
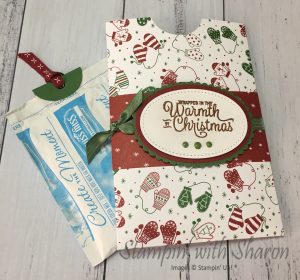
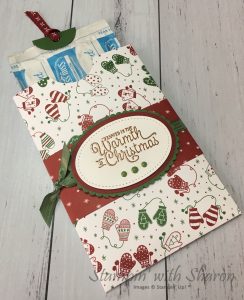
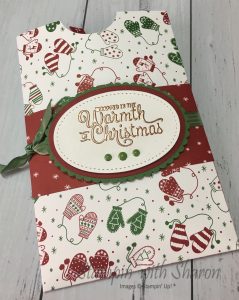
On this 2nd Day of Christmas I wanted to share this gorgeous little pouch with you. It is a sweet little pouch that holds a pack of Swiss Miss Hot Chocolate mix. I have attached a fold circle at the top of the packet with Mini Glue Dots and then punched a hole in the middle and used that Cherry Cobbler cross stitched ribbon. I’ve used the oval framelits with the stitched oval framelits on top.
This was a really simple pouch to make. All I did was measure how big the satchet was and worked out what size the pouch had to be. The seam was half an inch on the side and bottom.
Welcome to the first post of my 12 Days of Christmas Series.
I wanted to created 12 projects that you can make yourself with Stampin’ Up! products that are cheap and easy.
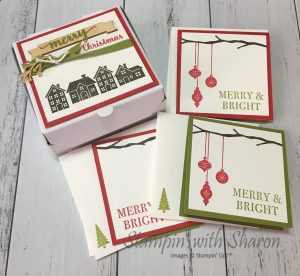
I make this cute little pizza box with matching cards and envelopes. The cards and envelopes are 3″x3″ and are great for on top of christmas gifts or for your kids to write in for their friends.
I have used a few stamp sets on this project but the one that stands out is the “Hearts Come Home”. It is a gorgeous little set with cute houses, Santa flying with his reindeer and some lovely sentiments. I have used elements from the Be Merry Rosette Kit along with the branch from Colorful Seasons stamp set. I added an embellishment from the Year of Cheer Embellishments. The christmas baubles are from the Carols of Christmas Stamp set.
The Pizza Boxes are super cute too and I am hoping that they may carry over into the next catalogue but we won’t know till later in the month. So if you love these boxes as much as I do, then don’t wait another minute, go to my online shop and order them today.
As OnStage was on the Gold Coast this year we needed to travel and find accommodation. I booked some accommodation for 4 and had 3 amazing fellow demos staying with me including one of my fabulous downlines.


 This is a gorgeous paper wreath that I’ve seen on different Facebook pages and so I have made my own to go on my front door. I just love the colours of Cherry Cobbler & Garden Green together. They really are great Christmas Colours. I added the Black Striped Ribbon to add some more contrast and added in the Cherry Cobbler Stitched ribbon.
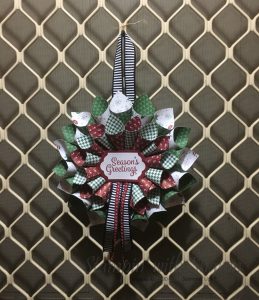


 Striped Ribbon")


")


 Envelopes")